For general information about adding new devices, such as agents, see ‘Adding Devices for Monitoring’.
Types of Agents
The NiTO agent is capable of performing checks on a Windows or Linux/Unix based system by accessing data local to the operating system it’s running on. This local data is collected with next to no overhead. Agents track high-resolution metrics in intervals of seconds, not minutes.
Of course, there’s hardware inside your network other than typical computers and VMs, such as routers, or even intranet websites. An agent can monitor most business-grade hardware as well, even if you cannot install software on them directly; see “peer devices”.
The NiTO agent has few dependencies and can run on most current operating systems (and many that are EOL):
- Windows OS (Windows XP/ Server 2003 or greater)
- Linux OS (w/glibc 2.5 or greater; requires Curl and OpenSSL from yum/apt)
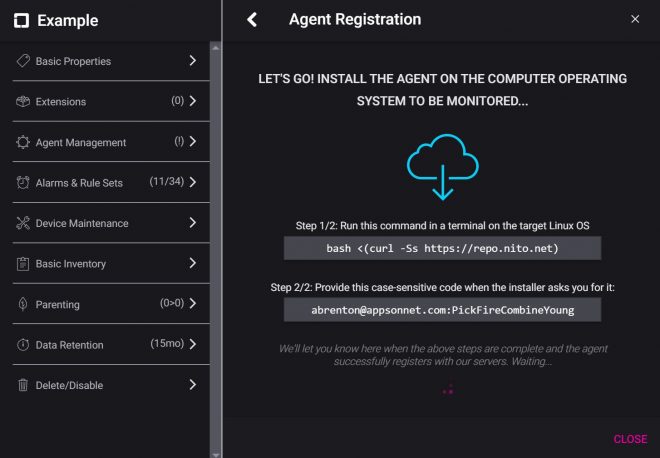
Installing an agent
There are two modes of agent installation for any operating system you install to, via the ‘New Device’ popover. When you choose the ‘Server(s) / Virtualization’ Category, you can choose from either:
- Single Agent Install (named)
- Unnamed Agent Install
With Single Agent Install, you specify a name and choose a folder BEFORE installing the agent on a machine. You’ll be provided with a one-time registration code that is unique for that single installation. This unique code will expire as soon as the installation is complete. This method is straightforward and allows you to specify a name and folder up-front, but is limited to one device at a time.
With Unnamed Agent Install, you use a reusable registration code for multiple agent installations. This registration code is unique per user. Because it is intended for bulk installation, this method allows you to skip the step of providing a name for each device up-front. Instead, the device is automatically given a name based on the host name of the machine that it is installed on. This name may be suffixed with a number if the same name already exists within the target folder. You can change the given name later.
“Lost & Found” folder
The “Lost & Found” folder may appear when the Unnamed Agent Install method is used and installation is attempted against a folder that does not exist, or which the user does not have access to. This allows the installation to succeed, but requires someone with access to the “Lost & Found” folder to move it to the intended folder.
Delayed Activation
The Delayed Activation option is available when you choose the Unnamed Agent Install method. This is useful if you’re creating an OS base image that will be cloned and installed on multiple machines. The agent will be installed and the registration code will be stored in a temporary file locally, however, the agent will not start or be registered with NiTO until the next time the machine boots up (i.e., you would likely install the agent using Delayed Activation as the last step during the creation of the seed image; each clone would then register itself with NiTO automatically when they boot for the first time). This option is available with ‘Unammed Agent Install’.
Uninstalling
When you delete or disable the agent from within the NiTO portal, it will become inactive on the host machine. However, to completely remove the binaries from the host machine, you’ll need to uninstall it from the host itself.
On Windows, use ‘Add & Remove Programs’ or the NiTO Uninstall wizard.
On Linux, you can uninstall the agent in a single command. Note that if the agent is still active in the NiTO portal when you run this command, you may receive ‘Down’ alerts until you delete it from within the portal itself:
bash <(curl -Ss https://repo.nito.net/uninstall)
You can remotely disable an agent in the NiTO portal (i.e., as a scripted decommission event) from the agent’s host machine by executing the NiTO binary with the -R argument. Remotely disabling an agent will not purge the historical data nor remove it from billing – collected data for the agent will be retained in the portal where you can then delete or re-register the agent from within the portal. For example, on Linux, you can disable the agent from the portal and then uninstall it from the local machine, in a single script:
#!/bin/bash
/opt/nito/bin/nito -R
bash <(curl -Ss https://repo.nito.net/uninstall)